"SEEFLUGZEUG JÄGER"
Model Subject: Brandenburg W 29
Kit Used: TOKO, kit no. 115
History of the aircraft modeled:
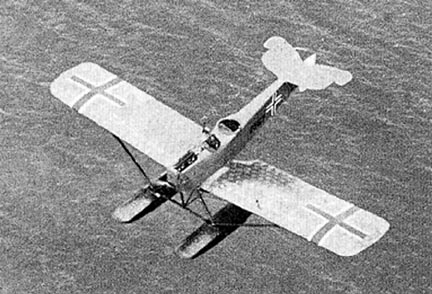
The Hansa-Branderburg (more commonly referred to as Brandenburg) W 29 evolved from the bi-plane seaplane fighter W 12. Excellent though the W 12 was, as the war moved into its final phase, it was clear to the Germans that a faster aircraft was needed to catch the British and American Felixstone F.2A and Curtiss NC-4 flying boats, which with a top speed of 92-95 miles per hour were able to outrun their pursuers. Ernst Heinkel reasoned that the best approach to achieve the performance required was to opt for a monoplane design. So the W 29 consisted basically of the fuselage and engine of the W 12 allied to a new single wingplane. The concept proved valid as the W 29 displayed a 10-mph higher top speed than the W 12. This may not seem like much to us now, but in 1918 it was the difference between chasing down a foe or waiting until another day.
The W 29's fuselage was of the same upswept design of the W 12, but was a foot shorter in overall length due to center of gravity changes incorporated by the single wing. The wing was a little over seven inches longer in span than the bi-plane wings and was of a much wider chord in order to maintain as near a wingloading figure as the bi-plane W 12 as possible. The wings were thick in section narrowing at the root and towards the blunt, rounded tips; it was constructed on the twin wood-spar principle, with fabric covering. Armament consisted of two forward firing fixed Spandau LMG/15 machine guns and one rear firing Parabellum on a mobile mount.
Although the career of the W 29 was cut short by the end of hostilities, they were well received by German coastal patrol units and were used quite successfully against allied aircraft and shipping in the North Sea and English Channel areas. They enter service in April 1918 and by the Armistice, seventy-eight had been built and delivered. Denmark, Finland, and Norway built many upgraded examples using higher output engines and designated W 33s after the war for use.
The plaque's title translates to "Seaplane Fighter".
Additions, modifications, etc.:
Interior:
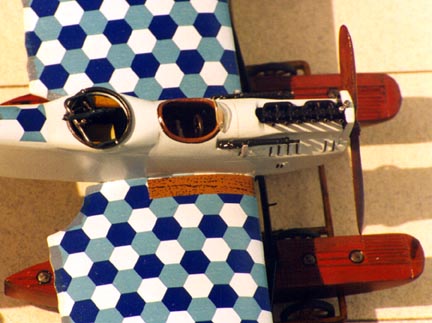
Not much to add here folks. I added was a blocking plate in front of the rudder bar, so that one could not see through to the engine compartment. I also added a couple of seat belts from masking tape and a couple of latch belts for the extra parabellum cartridge cases molded into each fuselage sidewall from masking tape.
The instructions would have you paint the interior doped linen, but the fuselages of W 29s were covered with thin plywood, so I painted the interior a light wood color followed by dry brushings of light brown, dark brown, and black. Interior ribs molded on the sidewalls were brushed in dark brown, the ribs on the bottom were done with dark wood decal film. The instrument panel was painted wood and gauges painted silver and white before receiving instrument gauges from Reheat Models. The control wheel and rudder bar were painted flat black and semi-glossed with clear, with the wheel brushed in dark brown and semi-gloss clear. The seat and cockpit coaming were painted leather. The observer/gunner's seat was painted doped linen as these were done with canvas duck and folded up for the gunner to fire.
Engine:
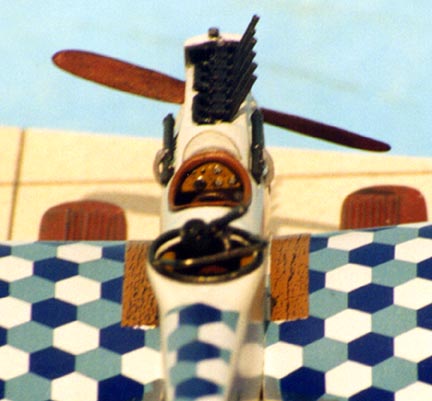
All I can say is Wow! TOKO's rendition of the Benz engine for this scale is truly remarkable. If more of the engine could have been seen, I would have added plug wires, but as it was not so I left it be. I would like to do a build up of this engine with all the plumbing and mount it outside the body, It is truly a work of art for injection molded plastic. TOKO supplies the six exhausts and they are really not all that bad, but installation in the final assembly would be near impossible. I opted to substitute sections of 23-gauge hypodermic needle for my exhaust stacks. A section of .018 wire was cemented to the lower section of the exhausts for installation into predrilled holes in each engine block in the final assembly. This made masking an already hard to mask engine much easier when fuselage paint was applied. The radiator lacked any detail on the backside, so I painted it steel and added a piece of black trim film for the radiator itself. The engine block assembly was painted flat black, with the carburetor and lower casing and pan brushed bright silver and clear flat.
Floats and struts:
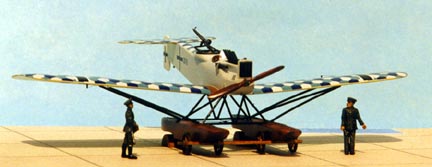
The floats are very well molded in three pieces each. The struts required only a little clean up, but I attached some .018 copper wire for attachment to the floats and the subsequent attachment in the final assembly to the fuselage. The extended wires at the end of the wing struts are correct, as they were rods on the real aircraft used to adjust the incident of dihedral. The strut pieces were painted flat black and semi-gloss clear, then set aside until attachment to the floats.
The floats were cleaned up and sanded smooth at the cement joints and primed in medium gray. It was then painted Italian Camo Brown. After the brown had dried, I gave the floats dry brushings of light brown, dark brown, and black before finishing with an over spray of semi-gloss clear. They, too, were set aside until attachment to the floats near final assembly. The attachment wires really aided in attaching the struts, but they are otherwise correct in size. The rods between the fuselage/wing struts were done with .008 stainless surgical thread, painted semi-gloss black and attached after the cement of the fuselage and wing struts to float had set up.
Exterior:

Beautiful! MPM could take some lessons from TOKO's engineers when it comes to fit. I only had to remove a little plastic with file and sandpaper at the wing fuselage joint, otherwise this kit fit like a silk glove. No windshield was supplied with the kit, so I cut one from clear butyrate (it's easier to bend than styrene). The Spandaus have overtly undersized cooling jackets, but the moldings are flawless. I added a cartridge case support rod and gunsight to the parabellum gun from small wire and photoetched gunsights. If I had to take money into consideration, I would have to say this was the best kit I have purchased this year (1999) and if all of TOKO's kits fit this good, I'm going to purchase the lot. I paid less than $5.00US for mine and getting this quality a kit for those bucks is really a pleasure. Buy them all before trouble breaks out in that region of the world and they are no longer available. Better yet, move TOKO to a more profitable and safe region. These guys are doing their homework and we modelers are the beneficiaries.
Painting and decaling:
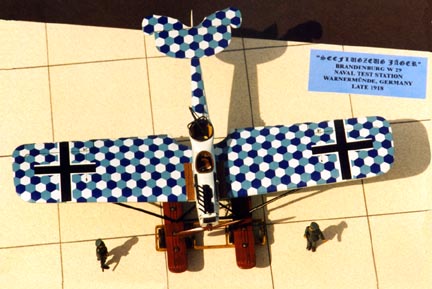
All guns and exhaust stacks were primed in flat black and bushed gunmetal and burnt iron respectively. The under surfaces of the wings and horizontal tail were painted doped linen and masked. After masking the engine and cockpit openings, I gave the entire model three coats of RAF Sky Blue. Although this was really not the correct color, it was the best out of the bottle paint I had for the lightest lozenge pattern color in the decal, which the fuselage should be. Ergo the lightest decal color is incorrect, but the Prussian Blue and intermediate gray are correct The hexagons are a bit oversized, but much to scale than MPM's undersized lozenge hexagons. Under wing masking was removed and the entire model given three coats of clear gloss. The kit decals were used throughout and they are much better that Propagtem. The upper wing and tail lozenge decals are fine in length, but a little short in width, so I had to touch up the trailing edges with sky blue, intermediate blue-gray, and Prussian blue. After allowing the full wing lozenge decals to dry a full day (I also had to stay with them all day and punture the many air bubbles before applying a little MicroSol to them), I gave the decals another sealing coat of clear gloss and let it dry before applying the upper wing crosses and wood wing walks from dark wood trim film. After all had dried, I gave the model two coats of semi-gloss clear. Some will argue that I should have used clear flat, but these planes and most all seaplanes received many coats of clear varnish to seal and waterproof them and as a rule had much more of a sheen than land-based planes. Photos in WINDSOCK's Datafile on the W 29 bears this out.
After all painting was done I added control rods of fine wire and control wires of smoke-colored invisible thread. The braces between the floats were done with surgical stainless thread painted black. The dolly came with the kit and was first painted light wood brown and drybrushed in a lighter brown and darker brown, with a tinge drybrushing of black. Wheels for the dolly were brushed in dark brown.
The figures came from some old New Hope Design figures for WW I pilots and crewmen and I don't believe they are in production any longer. They were molded in a very soft white metal and the engraving was excellent for this scale, as the figures bear out. They were primed in metal primer and brush painted with acrylics before being shaded with diluted India ink and dry brushed for highlights.
 Back
Back