Tamiya 1/32 F-4J Phantom II
By Kelly Quirk
 I have always
been a huge fan of the Phantom, and in particular the US Navy variants. In my entire
modeling lifetime, I have built more F-4's than any other plane. I have long desired a
good kit in 1/32 scale, even going as far as writing letters to the major model
manufactures begging them to produce one. Tamiya finally answered my prayers, and I must
say they did not disappoint me. The single piece fuselage is very nicely engraved, even
with the rivet detail, and raised panels in the right places. The single piece moulding
rids you of having to join two halves together, and then having to sand and rescribe the
spine of the aircraft as in days past. Part fit was pretty good throughout, the only
trouble spot I had was with the vertical tailpiece. No matter what I did, I just couldn't
get it to set down flush with the fuselage. I ended up with several applications of gap
filling super-glue, and after sanding and painting, it looks fine. I also encountered a
very small gap between the wing to fuselage joint, but that was very easy to fill in with
super-glue. Part fit otherwise was excellent, in fact I painted the metal part of the tail
of the jet and the jet itself before putting the parts together, and there is virtually no
seem. This was much easier than masking the parts after assembly and then painting it.
I have always
been a huge fan of the Phantom, and in particular the US Navy variants. In my entire
modeling lifetime, I have built more F-4's than any other plane. I have long desired a
good kit in 1/32 scale, even going as far as writing letters to the major model
manufactures begging them to produce one. Tamiya finally answered my prayers, and I must
say they did not disappoint me. The single piece fuselage is very nicely engraved, even
with the rivet detail, and raised panels in the right places. The single piece moulding
rids you of having to join two halves together, and then having to sand and rescribe the
spine of the aircraft as in days past. Part fit was pretty good throughout, the only
trouble spot I had was with the vertical tailpiece. No matter what I did, I just couldn't
get it to set down flush with the fuselage. I ended up with several applications of gap
filling super-glue, and after sanding and painting, it looks fine. I also encountered a
very small gap between the wing to fuselage joint, but that was very easy to fill in with
super-glue. Part fit otherwise was excellent, in fact I painted the metal part of the tail
of the jet and the jet itself before putting the parts together, and there is virtually no
seem. This was much easier than masking the parts after assembly and then painting it.
The cast metal landing gear is very sturdy - it needs to be, this model is BIG - and
it is 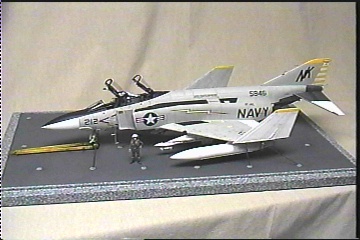 secured in
place with supplied screws. The only part of the model I am really disappointed about is
the intakes. The way they are engineered, there is an overlapping of joints about an inch
inside the intake. There is probably a way of fixing this, but I didn't have the patience
to try and figure out how. There is not exactly a ton of detail inside the intakes, in
fact you can just barely see the engine fan blades, so I made intake covers from styrene
and glued those over the intake openings. Problem solved. Building the rest of the model
was pretty straight forward, so I will just go into the extra work I did to it for the
purpose of this review. Most of the extra work was done in the cockpit. I used Waldron
modern jet gauges in the front panels, and they were well worth the effort. I also
scratchbuilt the opening mechanisms for the canopies out of bits of plastic rod and Grandt
Line bolts. Also added wires and cables in various places, made from copper wire and
Verlinden flexible hoses.
secured in
place with supplied screws. The only part of the model I am really disappointed about is
the intakes. The way they are engineered, there is an overlapping of joints about an inch
inside the intake. There is probably a way of fixing this, but I didn't have the patience
to try and figure out how. There is not exactly a ton of detail inside the intakes, in
fact you can just barely see the engine fan blades, so I made intake covers from styrene
and glued those over the intake openings. Problem solved. Building the rest of the model
was pretty straight forward, so I will just go into the extra work I did to it for the
purpose of this review. Most of the extra work was done in the cockpit. I used Waldron
modern jet gauges in the front panels, and they were well worth the effort. I also
scratchbuilt the opening mechanisms for the canopies out of bits of plastic rod and Grandt
Line bolts. Also added wires and cables in various places, made from copper wire and
Verlinden flexible hoses.
One detail in all Phantoms that a lot of modelers don't catch is a small coiled wire
(almost like a spring) that goes from the right rear of the ejection seat to the rear of
each canopy. In this large scale, the effect is spectacular. On the ejection seat
themselves, that is quite a story. I purchased resin seats from Verlinden, but was not
real pleased with them. Problem number one is they are made for Air Force Phantoms, not
the Navy version. So I went back to the kit seats, which are really not bad, they just
need some fixing up. I used the hardware from the Verlinden seats, and made belts from
fabric from ReHeat, and also used lead foil for the smaller belts. I used very thin solder
to detail the seats, bits of sheet styrene, and more Grandt Line nuts and bolts. Also
added the drogue chute cable made from solder, and the secondary ejection pull ring from
solder. Also in the canopy I used photo-etched canopy rails, hooks, and the holes in the
sills to accept the hooks.
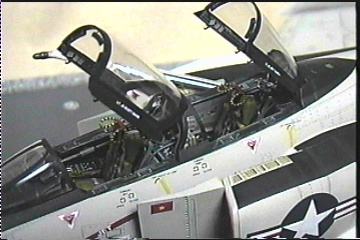 To finish it
off I added photo-etched mirrors with stretched sprue mounts to the two canopies. A lot of
work in a small area, but every bit of it shows well. On the landing gear, I simply added
a few hydraulic lines, as well as a few in the wheel wells. I added the ring to the
nosegear for the tie down chains out of solder. I was very pleased that Tamiya provided
the option to fold the wing tips, as I wanted to show mine in the stowed position. There
is a fair amount of detail in the fold provided by Tamiya, I added the folding mechanism
(which is basically a small arm) out of styrene cut to shape and detailed with a couple
bolt heads. Also put in a couple small hydraulic lines. I have heard complaints about the
kit decals, but mine were perfect. I only used the walkways, the large "NAVY"
and the stencilling, but they went on with no problem at all, and were in perfect
register. For the rest of the markings I used the Superscale set for the VF-142
"Ghostriders" off the USS Enterprise in 1972. I used ModelMaster paints for the
entire model, and weathered with pencil, oils, and pastels. The metal work on the tail
section was done in different shades of buffing Metalizer.
To finish it
off I added photo-etched mirrors with stretched sprue mounts to the two canopies. A lot of
work in a small area, but every bit of it shows well. On the landing gear, I simply added
a few hydraulic lines, as well as a few in the wheel wells. I added the ring to the
nosegear for the tie down chains out of solder. I was very pleased that Tamiya provided
the option to fold the wing tips, as I wanted to show mine in the stowed position. There
is a fair amount of detail in the fold provided by Tamiya, I added the folding mechanism
(which is basically a small arm) out of styrene cut to shape and detailed with a couple
bolt heads. Also put in a couple small hydraulic lines. I have heard complaints about the
kit decals, but mine were perfect. I only used the walkways, the large "NAVY"
and the stencilling, but they went on with no problem at all, and were in perfect
register. For the rest of the markings I used the Superscale set for the VF-142
"Ghostriders" off the USS Enterprise in 1972. I used ModelMaster paints for the
entire model, and weathered with pencil, oils, and pastels. The metal work on the tail
section was done in different shades of buffing Metalizer.
One of my personal favorite tricks in modeling is doing the navigation lights. I
paint them the correct colors (red, green, white) and after the paint is dry, apply a
small glop of 5 minute epoxy with a sharpened toothpick. When dry, it produces a very
realistic lens. Do this AFTER your final flat coating. For a unique display I purchased a
carrier deck set made by FlightPath, and it has all the tie down points, chains and hooks,
tow bar, and wheel chocks. With the F-4 all chained down to the deck, it looks very
impressive. The hook mechanisms look great in this large scale. Overall, I am very pleased
with the kit. Thank you Tamiya!!!! (maybe my letter did some good!) If anyone wants to
visit with me about it (or take me to task for something I did wrong) please e-mail me,
I'd love to talk about it. Now I will start my letter writing campaign for a 1/48 SH-60
SeaHawk!
To see more pictures of this excellent model by Kelly click here
 Back
Back